

Prosecutor
-
Posts
22 -
Joined
-
Last visited
Posts posted by Prosecutor
-
-
Red Monsters are aggro
Monsters with icon are capturable
Green Monsters are minibosses
Level of the monster
Italicized monsters are summoned by the monster directly above them
ACT 1
NosVille Chicken Level 1
Baby Dander Level 1
Dander Level 2
Weak Seedle Level 3
NosVille Meadows
Large Dander Level 4
Seedle Level 5
Strong Seedle Level 6 Happy Wooly Level 7
Soft Pii-Pod Level 8
Soft Pii Level 8 Happy Hamster Level 9
Pii-Pod Level 10
Pii Level 10 Wooly Level 11 Hamster Level 12
Hard Pii-Pod Level 13
Hard Pii Level 13
Mine Plains
Weak Toxi Dander Level 14 Angry Hamster Level 15
Light Fire Seedle Level 15 Baby Fox Level 16
Happy Mandra Level 17
Toxi-Dander Level 18
Happy Miner Level 18
Fire Seedle Level 19
Weak Expy Miner Level 19
Mandra Level 20
Strong Toxi-Dander Level 21 Angry Wooly Level 21
Heavy Fire Seedle Level 22 Fox Level 22
Miner Level 22
Expy Miner Level 23
Giant Chick Level 27
Western Mine 1
Happy Miner Level 18
Weak Expy-Miner Level 19
Western Mine 2
Miner Level 22
Angry Miner Level 23
Expy-Miner Level 23
Tired Miner-Chief Level 24
Sunny Meadows Big Fox Level 25
Angry Mandra Level 26 Weak Poisonous Hamster Level 27
Baby Wild Pii Pod Level 27
Baby Wild Pii Level 27 Small Mufflon Level 28
Wild Pii-Pod Level 29
Wild Pii Level 29 Dusi-Fox Level 29 Poisonous Rat Level 30 Mufflon Level 30 Nervous Dusi-Fox Level 31
Weak Grassmandra Level 31 Big Mufflon Level 32
Big Wild Pii Pod Level 32
Big Wild Pii Level 32
Thousand-Year-Old Mandra Level 27
Secret Chicken Farm
Angry Chicken Level 20
Baby Red Jelly Level 23
Stone Cliff
Flying Goggloic Level 1
Weak Devil Vampire Level 42
Rumbler Level 43
Rocky Cliff 2
Flying Goggloic Level 1
Tired Red Jelly Level 43
Rumbler Level 43
Rumbler King Level 45
Rocky Cliff 3
Flying Goggloic Level 1
Rumbler Level 43
Morning Star Boing Level 44
Rumbler King Level 45
Rocky Cliff 4F
Flying Goggloic Level 1
Rumbler Level 43
Rumbler King Level 45
Giant Mandra Level 46
Fernon Outpost
Koaren Sword Fighter Level 34
Koaren Archer Level 35 Ram Level 35
Koaren Warrior Level 36
Grassmandra Level 36 Nervous Ram Level 37
Strong Grassmandra Level 38
Koaren Elite Sword Fighter Level 38
Koaren Elite Archer Level 39
Koaren Elite Warrior Level 40
Phoenix Gamecock Level 38
Northern Mine
Strong Expy-Miner Level 32
Chief Miner Level 33
Strong Miner-Chief Level 34
Closed Mine
Strong Fire Vampie Level 35
Grassmandra Level 36
Strong Grassmandra Level 38
Weak Devi-Vampie Level 42
Closed Mine -1
Weak Red Jelly Level 34
Weak Dark Jelly Level 34
Weak Pink Jelly Level 34
Invisible Jelly Level 34
Fire Slade Level 35
Grassmandra Level 36
Mole Level 41
Temple Pathway
Strong Grassmandra Level 38
Ginseng Level 38 Steel Hamster Level 43
Wizard Tower
Flying Goggloic Level 1
Enchanted Sword Level 36
Enchanted Bow Level 37
Enchanted Morning Star Level 38
Comet Meadows
Crazy Dander Level 45
Violent Seedle Level 45
Violent Chicken Level 48
Fernon Temple 1F
Small Morning Star Boing Level 40 Pink Jelly Level 41
Rookie Kenko Sword Fighter Level 41
Rookie Kenko Spearman Level 42
Rookie Kenko Raider Level 43 Steel Hamster Level 43
Angry Morning Star Mimic Level 44
Imp Level 45
Devil Vampire Level 46
Hell Guard Dog Level 38
Fernon Temple 2F/3F
Light Tree Soul Level 40
Fernon Temple 4F/5F
Dark Tree Soul Level 41
Fernon Temple 6F/7F
Cold Tree Soul Level 42
Fernon Temple 8F/9F
Warm Tree Soul Level 43
Fernon Temple -1
Morning Star Boing Level 44
Kenko Swordsman Level 44 Oto-Fox Level 45
Kenko Spearman Level 45
Kenko Raider Level 46
Devil Vampie Level 46
Tired Stone Walker Level 47
Happy Horn-Imp Level 48
Nervous Thornwalker Level 49
Northern Exit
Devil Vampie Level 46
Kenko Raider Level 46
Tired Stone Walker Level 47
Eastern Exit
Strong Devil Vampie Level 47
Tired Stone Walker Level 47
Happy Horn Imp Level 48
Elite Kenko Swordsman Level 48
Western Exit
Strong Devil Vampie Level 47
Happy Horn-Imp Level 48
Elite Kenko Swordsman Level 48
Elite Kenko Spearman Level 49
Nervous Thornwalker Level 49
Fernon Temple -2 Large Steel Hamster Level 47
Strong Devil Vampie Level 47
Happy Horn Imp Level 48
Elite Kenko Swordsman Level 48
Elite Kenko Spearman Level 49 Angry Oto-Fox Level 49
Elite Kenko Raider Level 50
Flame Level 50
Large Imp Level 50
Nervous Red Jelly Level 51
Horn Imp Level 52
Warepard Level 53
Thousand-Year Potato Level 51
Mysterious Gates
Standing Goggloic Level 99
Fernon's Hideout 1
Elite Kenko Raider Level 50
Angry Flame Level 51
Horn Imp Level 52
Dark Jelly Level 53
Stone Walker Level 54
Fernon's Hideout 2
Nervous Red Jelly Level 51
Horn Imp Level 52
Small Devil Imp Level 53
Angry Horn Imp Level 54
Nervous Stone Walker Level 55
Fernon's Hideout 3
Horn Imp Level 52
Warepard Level 53
Devil Imp Level 54
Nervous Stone Walker Level 55
Strong Gargs Level 56
Fernon's Hideout 4
Warepard Level 53
Gargs Level 54
Nervous Stone Walker Level 55
Strong Gargs Level 56
Mad Gargs Level 57
Fernon's Hideout 5
Stone Walker Level 54
Gargs Level 54
Nervous Stone Walker Level 55
Large Devil Imp Level 56
Mad Gargs Level 57
Spiral Maze E
Flying Goggloic Level 1
Weak Punkie Level 35
Spiral Maze W
Flying Goggloic Level 1
Dark Scorpio Level 35
Spiral Maze S
Flying Goggloic Level 1
Aqua Grasshopper Level 35
Spiral Maze N
Flying Goggloic Level 1
Flame Butterfly Level 35
Zigzag Trail
Flame Level 50
Nervous Red Jelly Level 51
Horn Imp Level 52
Dark Jelly Level 53ACT 2
Western Krem
Lazy Thorn Pii Pod Level 55
Lazy Thorn Pii Level 55
Angry Beehive Level 56
Angry Queen Bee Level 56
Angry Swarm of Bees Level 1
Small Wasp Level 57 Wolf Level 57 Mountain Turtle Level 58 Pig Level 58
Thorn Pii Pod Level 58
Thorn Pii Level 58 Brutal Wolf Level 59 Strong Pig Level 63
Giant Kyleguer Level 58
Deep Cave
Earth Worm Level 58
Terramonster Level 59
Peak Mt Krem (West Side) Mountain Turtle Level 58 Pig Level 58 Brutal Wolf Level 59
Easterly Mt Krem
Angry Beehive Level 56
Angry Swarm of Bees Level 1
Angry Queen Bee Level 56 Lion Wolf Level 60 Rock Turtle Level 61
Quick Thorn Pii Pod Level 61
Quick Thorn Pii Level 61 Brutal Lion Wolf Level 62 Strong Pig Level 63
Large Wasp Level 63
Tree Root Satan Level 63
Peak Mt Krem (East Side) Rock Turtle Level 61 Brutal Lion Wolf Level 62
Large Wasp Level 63
Cave of Ghosts
Warrior Soul Level 62
Archer Soul Level 62
Beast Level 63
Cursed Beast Level 72
Cool Cave
Angry Ice Fairy Level 55
Mountain Cave 1 Large Devil Imp Level 56
Skeleton Warrior Level 57
Small Toxi Spider Level 57 Rock Turtle Level 61
Red zone
Grub-Cricket Level 60
Mountain Cave 2
Old DustDeath Level 57
Weak Spider Level 58
Weak Lava Golem Level 58
Skeleton Warrior Level 60
Satellite Dunguri Level58
Blue Zone
Grub-Cricket Level 60
Misty Valley
Foggy Collosus Level 64
Cursed Foggy Collosus Level 72
Mountain Cave 3
Angry Beehive Level 56
Angry Bees Level 1
Queen Bee Level 56
Small Toxi Spider Level 57
Skeleton Level 57
Wiggy Wiggler Level 57
Small Wiggler Level 1 Mountain Turtle Level 58
Weak Spider Level 58
Strawee Level 59
Weak Spider King Level 60
Green Zone
Grub-Cricket Level 60
Mountain Cave 4
Angry Beehive Level 56
Angry Bees Level 1
Queen Bee Level 56
Old DustDeath Level 57
Weak Lava Golem Level 58
Strawee Level 59
Toxi Spider Level 59
Spider Level 60
Weak Spider King Level 60
Skeleton Warrior Level 60
Yellow zone
Grub-Cricket Level 60
Mountain Cave 5
Skeleton Warrior Level 60
DustDeath Level 61 Rock Turtle Level 61
Wiggler Level 61
Small Wiggler Level 1
Dangerous Beehive Level 63
Dangerous Swarn of Bees Level 1
Dangerous Queen Bee Level 63 Strong Pig Level 63
Mountain Cave 6 Brutal Wolf Level 59 Rock Turtle 61 Level 61 Brutal Lion Wolf Level 62
Large Toxi Spider Level 62
Strong Spider Level 62
Spider King Level 62
Large Wasp Level 63
Dangerous Beehive Level 63
Dangerous Swarn of Bees Level 1
Dangerous Queen Bee Level 63 Strong Pig Level 63
Shanera Dungeon -1
Lava Golem Level 61
Large Toxi Spider Level 62
Strong Spider Level 62
Angry Strawee Level 62
Darkwitch Level 62
Bloodwitch Level 62
Strong Skeleton Warrior Level 63
Large Wasp Level 63
Dangerous Beehive Level 63
Dangerous Swarn of Bees Level 1
Dangerous Queen Bee Level 63
Shanera Dungeon -2 Strong Pig Level 63
Strong Skeleton Warrior Level 63
Bloodwitch Level 63
Large Wasp Level 63
Dangerous Beehive Level 63
Dangerous Swarn of Bees Level 1
Dangerous Queen Bee Level 63
Rose Darkwitch Level 63
Strong Lava Golem Level 64
Angry Wiggler Level 64
Small Wiggler Level 1
Angry Skull Level 73
Shanera Dungeon -3
Large Toxi Spider Level 62
Strong Spider Level 62
Strong Skeleton Warrior Level 63
Ugly Spearman Level 63
Strong Spider King Level 64
Angry Wiggler Level 64
Small Wiggler Level 1
Strong Lava Golem Level 64
Darksy Dame Savina Level 64
Darksy Dame Edis Level 65
Ancient DustDeath Level 65
Vicious Strawee Level 65
Brutal Lava Golem Level 74
Labyrinth of Pain
Wheel Torturer Level 68
Pinch Torturer Level 68
Iron Torturer Level 68
Devil Lady Level 70
Cursed Devil Lady Level 72
Death Knight Level 72
Shanera Dungeon -4
Strong Lava Golem Level 64
Vicious Strawee Level 65
Ancient DustDeath Level 65
Ghastly Spearman Level 65
Marsha Darkwitch Level 65
Darksy Dame Sylvia Level 66
Furious Skull Level 66
Angry Lava Golem Level 68
Cursed Skull Level 69
Sad DustDeath Level 69
Shadow King Level 68ACT 3
Secret Lab 1
Furious Skull Level 66
Weak Ufo Boing Level 67
Weak Spike Boing Level 68
Thin Zombie Guard Level 69
Bulky Zombie Guard Level 70
Secret Lab 2
Weak Ufo Boing Level 67
Weak Spike Boing Level 68
Thin Zombie Guard Level 69
Bulky Zombie Guard Level 70
Strong Ufo Boing Level 70
Strong Spike Boing Level 71
Lanky Zombie Guard Level 73
Fat Zombie Guard Level 74
Secret Lab 3
Strong Ufo Boing Level 70
Skull Archer Level 72
Lanky Zombie Guard Level 73
Skull Warrior Level 74
Mini Castra Level 72
Fir Forest
Weak Racoon Bird Level 68
Small Lizard Level 72
Green Giant Lizard Level 72
Stone Axe Stump Level 72
Strong Tree Zombie Level 73
Stone Hammer Stump Level 73
Slade Golem Level 68
Stream Mine -1
Giant Leech Level 72
Leech King Level 73
Stream Mine -2
Giant Leech Level 72
Leech King Level 73
Fat Leech Level 76
Stream Mine -3
Fire Golem Level 72
Underground Tunnel -1
Giant Leech Level 72
Larva Level 75
Giant Larva Level 77
Underground Tunnel -2
Fire Golem Level 72
Leech King Level 73
Underground Tunnel -3
Giant Leech Level 72
Basilisk Level 75
Basilisk King Level 82
Edge of Fir Woods
Steel Axe Stump Level 72
Steel Hammer Stump Level 73
Strong Tree Zombie Level 73
Angry Tree Zombie Level 74
Yak Warrior Level 75
Yak Magician Level 75
Giant Warrior Level 82
Maple Woods
Wollet Level 70
Strong Racoon Bird Level 70
Fat Pigeon Level 70
Cogger A Level 71
Cogger B Level 71
Green Giant Lizard Level 72
Moth Level 75
Maple Devil Level 78
Thousand-Year Ginseng Level 76
Forest Bottom (Eastern Portal)
Cricket Mole Level 74
Young Mole Level 75
Large Rechen Level 77
Small Rechen Level 75
Forest Bottom (Western Portal)
Young Mole Level 75
Large Rechen Level 77
Small Rechen Level 75
Mother Mole Level 78
King Crab Level 88
Outskirts of the Maple Woods
Cogger A Level 71
Cogger B Level 71
Maple Devil Level 78
Graylander Level 79
Spirit of an Old Tree Level 79
Underground Pathway
Large Rechen Level 77
Small Rechen Level 75
Mother Mole Level 78
Seli-Lusha -1
Sentinel Level 72
Seli-Lusha -2
Sentinel Level 75
Seli-Lusha -3
Sentinel Level 75
Seli-Lusha -4
Sentinel Level 78
ACT 4
Eastern Frost Land
Jackpen Level 30
Kangpen Level 35
Suspicious Gnoll Scout Level 35
Little Suspicious Gnoll Scout Level 35
Definately Suspicious Gnoll Scout Level 35
Very Suspicious Gnoll Scout Level 35
Junior Gnoll Battlescout Level 35
Cappen Level 43
Demon Guardian Level 99
Western Frost Land
Jackpen Level 30
Kangpen Level 35
Suspicious Gnoll Scout Level 35
Little Suspicious Gnoll Scout Level 35
Definately Suspicious Gnoll Scout Level 35
Very Suspicious Gnoll Scout Level 35
Junior Gnoll Battlescout Level 35
Cappen Level 43
Angel Guardian Level 99
Northern Ice Desert
Prota Level 45
Junior Enkidu Level 50
Gnoll Scout Level 50
Angry Ice Fairy Level 55
Docile Yeti Level 55
Gnoll Warrior Level 60
Ice Worm Level 60
Lace Level 70
Angel Guardian Level 99
Demon Guardian Level 99
Cappen King Level 55
Bitoren Tundra
Snow Fox Level 62
Fierce Prota Level 67
Snow Lion Level 68
Ice Woman Level 70
Snow Basilisk Level 74
Angel Guardian Level 99
Demon Guardian Level 99ACT 5
Harbour Environment
Ocean Sand Fox Level 78
Ocean Sand Prota Level 78
Sea Sand Fish Level 79
Ocean Sand Cactus Level 80
Sea Sand CutterLevel 80
Niel's Camp Surroundings
Strange Chest Level 70
Ocean Sand Fox Level 78
Ocean Sand Prota Level 78
Neil's Patrol Samurai Level 78
Sea Sand Fish Level 79
Ocean Sand Cactus Level 80
Ocean Sand Scorpion Level 80
Sea Sand Blade Horn Level 80
Neil's Patrol Spy Level 80
Neil's Patrol Scout Level 80
Niel's Camp
Camp Guard Level 70
Neil's Elite-Samurai Level 79
Neil's Elite Assassin Level 80
Neil's Elite Hunter Level 81
Neil's Elite Bomber Level 81
Neil's Key Master Level 81
Neil's Jailer Level 81
Neil's Storekeeper Level 81
Commander Nill Level 83
Eastern Merchant Camp
Storm Sand Prota Level 79
Storm Sand Fox Level 79
Storm Sand Basilisk Level 81
Storm Sand Cactus Level 81
Storm Sand Creeper Level 81
Storm Sand Predator Level 82
Storm Sand Spike Creeper Level 82
Shoran's Patrol Assassin Level 84
Shoran's Patrol Hunter Level 85
Robber Camp Surroundings
Shay's Patrol Samurai Level 83
Shoran's Patrol Samurai Level 83
Shoran's Patrol Assassin Level 84
Shay's Patrol Assassin Level 84
Shay's Patrol Bomber Level 85
Shay's Patrol Hunter Level 85
Shoran's Patrol Hunter Level 85
Shoran's Patrol Bomber Level 85
Desert Robber Camp
Shay's Transport Samurai Level 84
Shoran's Transport Samurai Level 84
Shoran's Patrol Samurai Level 85
Desert Robber Jailer Level 85
Desert Robber Key Master Level 85
Shay's Transport Assassin Level 85
Shay's Patrol Samurai Level 85
Shoran's Transport Assassin Level 85
Shoran's Transport Hunter Level 86
Shoran's Transport Bomber Level 86
Shoran's Patrol Assassin Level 86
Shay's Transport Hunter Level 86
Shay's Transport Bomber Level 86
Shay's Patrol Assassin Level 86
Shay's Patrol Bomber Level 87
Shay's Patrol Hunter Level 87
Shoran's Patrol Hunter Level 87
Shoran's Patrol Bomber Level 87
Robber Courtyard
Shay's Samurai Escort Level 87
Shoran's Samurai Escort Level 87
Shay's Assassin Escort Level 88
Shoran's Assassin Escort Level 88
Shay's Hunter Escort Level 89
Shay's Bomber Escort Level 89
Shoran's Bomber Escort Level 89
Shoran's Hunter Escort Level 89
Robber Centre
Shay's Samurai GuardLevel 87
Shoran's Samurai Guard Level 87
Shay's Assassin Guard Level 88
Shoran's Assassin Guard Level 88
Shoran's Hunter Guard Level 89
Shoran's Bomber Guard Level 89
Shay's Hunter GuardLevel 89
Shay's Bomber GuardLevel 89
Commander Shoran Level 90
Commander Shay Level 90
Melki's Camp Surroundings
Storm Sand Prota Level 79
Storm Sand Fox Level 79
Melki's Patrol Samurai Level 79
Storm Sand Scorpion Level 80
Melki's Patrol Hunter Level 80
Melki's Patrol Bomber Level 80
Melki's Patrol Scout Level 81
Melki's Patrol Assassin Level 81
Melki's Patrol Spy Level 81
Storm Sand Blade Horn Level 81
Storm Sand Cactus Level 81
Storm Sand Basilisk Level 81
Storm Sand Creeper Level 81
Storm Sand Spike Creeper Level 82
Storm Sand Mantis Level 82
Storm Sand Predator Level 82
Melki's Camp
Melki's Elite Assassin Level 82
Melki's Key Master Level 82
Melki's Jailer Level 82
Melki's Elite Samurai Level 82
Melki's Elite Hunter Level 83
Melki's Elite Bomber Level 83
Commander Melky Level 85
Western Merchant Camp
Dust Sand Fox Level 79
Dust Sand Prota Level 79
Dust Sand Fish Level 80
Dust Sand Scorpion Level 80
Dust Sand Cactus Level 81
Dust Sand Blade Horn Level 81
Dust Sand Basilisk Level 81
Dust Sand Creeper Level 81
Dust Sand Predator Level 82
Dust Sand Mantis Level 82
Kerus's Camp Surroundings
Dust Sand Fox Level 79
Kerus's Patrol Samurai Level 79
Kerus's Patrol Hunter Level 80
Dust Sand Scorpion Level 80
Kerus's Patrol Bomber Level 80
Kerus's Patrol Scout Level 81
Kerus's Patrol Assassin Level 81
Kerus's Patrol Spy Level 81
Dust Sand Cactus Level 81
Dust Sand Creeper Level 81
Dust Sand Predator Level 82
Dust Sand Spike Creeper Level 82
Dust Sand Mantis Level 82
Kerus's Camp
Kerus's Elite Assassin Level 82
Kerus's Jailer Level 82
Kerus's Key Master Level 82
Kerus's Elite Samurai Level 82
Kerus's Elite Hunter Level 83
Kerus's Elite Bomber Level 83
Commander Kerus Level 85
Garton's Camp Surroundings
Garton's Patrol Samurai Level 81
Garton's Patrol Hunter Level 82
Garton's Patrol Bomber Level 82
Quicksand Scorpion Level 82
Quicksand Basilisk Level 83
Garton's Patrol Spy Level 83
Garton's Patrol Assassin Level 83
Quicksand Cactus Level 83
Quicksand Mantis Level 84
Quicksand Predator Level 84
Garton's Camp
Garton's Elite Assassin Level 85
Garton's Jailer Level 85
Garton's Key Master Level 85
Garton's Elite Samurai Level 85
Garton's Elite Hunter Level 86
Garton's Elite Bomber Level 86
Commander Gaton Level 88
Temple Path
Garton's Patrol Samurai Level 81
Sand Dwarf Level 81
Garton's Patrol Bomber Level 82
Garton's Patrol Hunter Level 82
Sandstorm Level 83
Garton's Patrol Scout Level 83
Garton's Patrol Assassin Level 83
Sand Spirit Level 84
Sand Giant Level 85
Temple Site
Desert Sand Dwarf Level 83
Desert Sand Spirit Level 85
Dust Sand Storm Level 85
Desert Sand Giant Level 86
Dust Sand Golem Level 89
Rashid Courtyard
Wind Sand Spirit Level 83
Wind Sand Gladiator Level 84
Volcano Sand Spirit Level 84
Wind Sand Archer Level 85
Wind Sand Magician Level 85
Volcano Sand Gladiator Level 85
Volcano Sand Archer Level 86
Volcano Sand Magician Level 86
Rashid Centre
Dune Spirit Level 85
Dune Gladiator Level 86
Dry Sand Spirit Level 86
Dune Archer Level 87
Dune Magician Level 87
Dry Sand Gladiator Level 87
Dry Sand Magician Level 88
Dry Sand Archer Level 88
Lost Desert
Desert Sand Prota Level 81
Desert Sand Fox Level 81
Desert Sand Fish Level 82
Desert Sand Scorpion Level 82
Desert Sand Creeper Level 83
Desert Sand Basilisk Level 83
Desert Sand Blade Horn Level 83
Desert Sand Cactus Level 83
Desert Sand Cutter Level 83
Desert Sand Spike Creeper Level 84
Desert Sand Mantis Level 84
Desert Sand Predator Level 84
Chaos Environment
Spirit Sand Fox Level 81
Spirit Sand Prota Level 81
Spirit Sand Fish Level 82
Spirit Sand Scorpion Level 82
Spirit Sand Creeper Level 83
Spirit Sand Basilisk Level 83
Spirit Sand Blade Horn Level 83
Spirit Sand Cutter Level 83
Spirit Sand Cactus Level 83
Spirit Sand Mantis Level 84
Spirit Sand Predator Level 84
Spirit Sand Spike Creeper Level 84
Aster Courtyard
Prayer Monk Level 83
Prayer Spirit Level 83
Prayer Leader Level 84
Prayer Priest Level 84
Lamentation Monk Level 85
Lamentation Spirit Level 85
Lamentation Leader Level 86
Lamentation Priest Level 86
Aster Centre
Monk of Agony Level 86
Spirit of Agony Level 86
Leader of Agony Level 87
Priest of Agony Level 87
Monk of Unrest Level 88
Spirit of Unrest Level 88
Leader of Unrest Level 89
Priest of Unrest Level 89 -
-
Trading is a way for players to obtain either gold or items they may want / need. But unfortunately, not everyone can be trusted. To avoid being scammed, please follow these tips:
- Make sure that the situation is not suspicious! If a player of a low level is offering to sell something such as a 4th specialist card that they could not even wear, then there would be no reason to supply them with your card carrier since they can only put the card inside IF they are able to wear it. Some instances players will claim to sell cards for an unrealistic price such as 4th specialist card for under 3 million gold. The quest alone requires a payment of 3 million gold to complete it. Evaluate the situation before making any action!
In both the examples, note that the character is level 1, of low reputation and, simply put, an adventurer! They are not able to wear the card to put it in a card carrier due to their reputation, job level, and class ( swordsman, sorcerer, archer ). A higher level / main character would need to be used to utilize the card carrier for the appropriate card being sold.
The example below is the illustrate that a card of a high value and level is extremely suspicious to be sold at such a low price. Know prices and what you are buying before you make any attempt to purchase it.
- Make sure that you are able to deal with the loss of items/gold. All trades are final (<--click for more information). You need to be sure that you know items/gold will not be refunded due to a scam or any other trade. To put it simply, don't put all your wealth into an unsure venture to be on the safe side.
- Make sure that the trade agreement is clear! It is always better for things to be said clearly and make sure that the other party is sure about the situation. The items / gold that is desired and that will be traded should be stated so that both players are certain of the trade agreement.
- Make sure that you know what you are obtaining. Right-clicking many items will reveal further information as to what is inside of them such as card carriers and pet beads. Even more so, items such as protection amulets and equipment will have differences among each other. Some have lower use counts than others, and certain equipment will have different stats or even shells on them.
Make sure to note the difference in the use of items!!
Make sure to note that there is the exact card you want with the proper job level and point distribution as agreed to!
- Make sure that, in all the cases possible, you have the trades set up perfectly on both sides. If you are trading for some equipment and the other player requests that you put down a small fee before he will trade the armor, it would not make any sense to do so. The trade should be the item(s)/gold you want against the item(s)/gold that the other player wants. It is much safer to buy a specialist card that is already in a card carrier than giving one to a stranger.
- Make sure to take screenshots. Taking screenshots of trade agreements and trade windows is a way to ensure a clear recording for yourself of the purpose and result of the trade. It is also essential when submitting a report about a scam. There is no need to rush through the trading process. You can move the trade window so that chat is visible, and you can also click on the specific form of chat used such as Whisper tab, so that you can take a screenshot of ALL the trade agreement. Remember, you can expand the chat box to get more of your chat into one screenshot by hovering your mouse under the chat tabs, press and hold left-click, and dragging the chat box up and down as desired.
An example of a useable screenshot that includes trade agreement and trade window with the item clearly displayed.
-
First off, partner sp's were only obtainable from the Winter Event. You had to do a quest for a snowman in Nosville. The quest involved collecting Ice, Fresh Cream Cakes, Chocolate Cakes, and a few other simple things and lead up to doing a TS. The TS was pretty much shaped like TS 80 (The on in FC if you've done it) You had to fight tiny snowman heads, and Santa Bushys. All damage was percentile. After completing that quest you were awarded a Snowman Seal and were allowed to raid then. The snowman raid boxes had the chance to give one of the three Water Partner SP's which were Aegir, Freya, and their son Barni. Aegir was for Kliff and Tom, Freya is used with Sakura, and Bob and Leona can equip Barni. When Leona uses Barni she get's and add-on buff to the skill Bad Boy.There are reset cards available to reset the level of the skills on the SP's, but since the ticket to make some skills permanent, it means YOU WILL LOSE ALL THOSE SKILL LEVELS AND HAVE TO START OVER. So only reset if you are CERTAIN you want to try getting better leveled skills.
Your partner skills have their own hot keys which are Shift + Q, W, and E. The skills are arranged from left to right on the hot keys in a similar manner to how the appear on the card.
Partner SP's have their own Card Carriers called Partner Card Carriers. They look just like normal Card Carriers expect they have a silverish look instead of the goldish/yellowish look of a normal Card Carrier. To put an SP into a Partner Card Carrier, you must have the SP equipped to the Partner following you when using the Card Carrier.
The picture below will contain the details on the SP's themselves and how to obtain their skills.-1.png) P.S This is not full info, because there are new SP's for the partners.
P.S This is not full info, because there are new SP's for the partners. -
Hey Guys, with a lot of effort I managed to gather up every 5.1 secondary quest from around the Desert.
The Quests are sorted in ascending level. The first line is the name of the quest, while the second and third
are the name of the NPC that provides you with it and the map where the NPC belongs.
Level 80:
Attack on the Harbour | Harbour Guard Tom | Mortaz Desert Harbor
Strange Happenings | Lighthouse Guard Chilton | Mortaz Desert Harbor
Harbor Defense | Hamid | Neil's Camp Surroundings
Level 81:
Stolen Trade Goods: Part 1 | Lighthouse Guard Chilton | Mortaz Desert Harbour
An Important Assistant | Harbour Guard Tom | Mortaz Desert Harbour
Lost Trade Goods: Part 1 | Harbour Guard Tom | Mortaz Desert Harbour
Level 82:
Stolen Trade Goods: Part 2 | Lighthouse Guard Chilton | Mortaz Desert Harbour
Lost Trade Goods: Part 2 | Harbour Guard Tom | Mortaz Desert Harbour
The Stolen Trade Goods | Noah | Akamur Camp
Negotiating With Desert Robbers | Noah | Akamur Camp
The Akamur Trade Route | Hazel | Akamur Camp
Level 83:
The Way To Melki's Camp | Hazel | Akamur Camp
Lost Trade Goods: Part 3 | Hamid | Neil's Camp Surroundings
Stolen Trade Goods: Part 3 | Hamid | Neil's Camp Surroundings
Liberating The Merchant | Chest Containing Command Lists | Melki's Camp
The Way To Kerus Camp | Hazel | Akamur Camp
Level 84:
The Last Negotiations | Semia | Akamur Quarter
The Desert Robbers Project | Nephi | Akamur Quarter
Know Your Enemy Like Yourself | Nephi | Akamur Quarter
Level 85:
Eradication of the Desert Robbers | Nephi | Akamur Quarters
The Captured Merchant | Chest Containing Scrolls | Desert Robber Camp
The Stolen Relicts | Nephi | Akamur Quarter
The Strange Relict | Strange Relic Piece | Robber Centre
Level 86:
The Lost Treasure Hunter | Riana | Treasure Hunter Camp
The Spirits of the Aster Courtyard | High Priestess Eladin | Aster Temple
The Rest of the Spirits | High Priestess Eladin | Aster Temple
The Chaos of the Aster Temple | Priestess Vera | Aster Temple
The Broken Relic | Broken Relics | Aster Courtyard
Level 87:
The Temple Site | Michol | Temple Site
The True Nature of the Temple Site | Michol | Temple Site
The Sentinel of the Forgotten Temple | Michol | Temple Site
The Relict of the Forgotten Temple | Michol | Temple Site
The Secret of the Forgotten Temple | Michol | Temple Site
Level 88:
Time for Defense | Velmon | Chaos Zone
A Man Named Xavier | Xavier | Chaos Zone
The Nature Of The Desert Robber | Xavier | Chaos Zone
The Desert Robber Letter | Chest | Kerus' Camp
The Desert Robber Schism | Diary of the Traveler | Robber Centre (Only after the completion of "Every effect has a cause" (89) unlocked!)
Level 89:
Retrieving The Stolen Gifts | Paul | Desert Eagle City
The Stolen Things Must Be Found | Delmon Milow | Desert Eagle City
Every Effect Has A Cause | Kamil | Robber Courtyard
The Desert Robbers' Recovery | Poison Bottle | Robber Centre (Only after the completion of "Every effect has a cause" (89) unlocked!)
Level 90:
The Terror From The Chaos Zone | Delmon Milow | Desert Eagle City
The Desert Robber's Leader | Kamil | Robber Courtyard-
 1
1
-
-
Super Hair Gel (Previously Wax A)


Super Hair Wax (Previously Wax B)

-
I. Normal pets
Method to obtain: Obtainable by usin the skill "Capture" on a low hp pet (must be lower then 50%),these pets can be found in act 1 and act 2 regions.
Utility: Average-Low,Good to have for lower event raids when you cant afford an expensive pet.
II. Nos pets
Method to obtain: Obtainable via Nosmall or event raids.
Utility: Very High,used by 90% of Nos.UK players,extremly good both in pvp and pve.
III. Exotic pets
Method to obtain: Obtainable only from forum events.
Utility: Very Low,used mostly for display.
1. Fibi Frosty :

2.Fluffy Bally


3. Centurio Bushtail

4. Puss in Boots

5. Viking Bushtail

6. Pumpkin Bushtail

7. Super Santa Bushtail/Santa EX-bushtail

Note : Super Santa Bushi and Santa EX are the same thing its just that in the past this pet was Called Santa EX bushi.
8. Cowboy Bushtail

9. Darko

10. Navy Bushtail

11. Shogun Bushtail


12. Pumpkin Bushtail EX
Note : I didnt make a ss with the bushi as its usseles to do it.Pupkin EX bushtail looks exactly like normal pumpkin bushtail,however they are different pets.
13. Inferno

14. Boxer Bushtail

15. Referee Bushtail

16. Indian Bushtail

17. Cute Bunny

Note : Cute Bunny Shock is an effect that also Referee and Boxer Bushtail have,i just didnt make 2 additional screenshots that describes the shock debuff,the information about shock already appears on the Cute Bunny spotlight.
18. Pest Control Bushtail

19. Rudi Rowdy

20. Vampie

21. Normal Bushtails


 [
[


Note : Normal bushtail is available in 7 colours (Brown which used to be the only available colour a long time ago,Red,Black,Pink,Turquoise,Blue and Yellow),the colours are purely just for aethestics,all the normal bushtails have the same stats.
22. Santa Bushtail
Note : Santa bushtail have the same apparence with Santa bushtail EX/Super Santa Bushtail/Santa Tori EX but they are extremly different pets.Santa bushtailis related with the Christmas event and Pajama card,when pajama perform a skill(more like emoticons),Santa bushi will do the same as Pajama.
23. Samurai Bushtail

24. Pegasus

25. Docile Yeti

26. Sick Bushtail


27. Special Unit Bushtail

28. Football Bushtails


England Germany Spain France Italy Czech
Note : There are in total 8 footbal bushtails,each football bushtail have a T-shirt related to a country,however the stats are the same for all football bushtails and the outfit is purely for the player preference.
29. Chick Norris

30. Dander

31. Aqua Bushtail

32. Gladiator Bushtail


33. Young Rudolph Bushtail

34. Pirate bushtail

Note : Pirate bushtail is available in 4 elements,the only difference beetwen the four pirate bushtails is only the element,the 4 bushtails are different from each other because of their element but all 4 have the rest of the stats the same.
35. Seraphim

36. Cuby

37. Walker


38. Pii

39. Rusty Robot

40. Rudolph Bushtail

Note : While young rudolph bushi looks like Rudolph bushi,Rudolph bushi is still bigger then him.
41. Bull Bushtail

42. Spring Fairy

43. Enkidu

-
1
-
-
Contents:
- Basic information about the Glacerus raid
- Team Composition
- How to do the raids
Glacerus:
Basic information:
Glacerus is water element, so you need water resistance.
Recommended is to use attack potions (some hosts require you to use them) and ice flower oils for quicker raids.
"Again I would like to remind you that it has recently become the norm to not use bear buff, although the raid
is not a %-damage raid in general. Please ask the host if you should
buff or not. (The crusader defense buff also adds hp, but in contrast to
the bear buff, it adds 1 point to the defence grade. The crusader buff
of defense will be overbuffed by the bear buff.) "
Recommended sps:
- Gladiator
- Warrior (morale) However, since warriors often have HP build, it is better to go Gladiator or Berzerker.
- Berzerker (frenzy)
- Crusader (Triple the host/strongest person, sader buff, sader debuff)
- Volcano (buff and attack)
- Red Mage (for the buff, or to attack if its really strong)
- Destroyer (gas! Gas after storm)
- Cannonshooter
- Wild Keeper (buff)
Extra buffers (not necessary, but could speed up the raid)
- Holy Mage
- Blue mage (Resistance)
- Ranger
(I, Galaco, like to bring a ranger to buff the strongest archer/swordie with Hawk Eye)
How to do the raid?
The host summons you to the raidplace, Water Cave, which you can enter via Felix Frost (The quest NPC). You often have to go either top left or top right for extra buffs. Buff up after you enter raid. Again, DO NOT BEAR AS A WK. You have the same lay out as Draco, lever room (reception) and bossroom. You go to boss room and you start attacking. Use Attackpot, to make the raid quicker.
- Glacerus has a skill that can bring your HP down to 1 immediately, when you see circles around Glacerus, you need to run away from the boss. It means he is going to 1 hp you. If you get hit, it doesn't matter that much, but it will cost you a fp, or a life. Please use a full pot, because otherwise you cant attack for 20 seconds and lose all your buffs. After this 1 hp skill, glacerus sometimes gets a debuff, 'Beast's Roar' that will make him more vulnerable to melee attacks, however he will reflect your damage to yourself, this means, you will lose 855 hp per hit yourself. Snack a bit or lower your attack speed to avoid your hp dropping.
- Glacerus has a skill that looks like a chunk of ice. You lose a lot of hp(50-60%) and you are sometimes slowed. After this skill Glacerus will gain a debuff which increases his attackspeed by 4, but will also make him more vulnerable to ranged and magic attacks.
- Glacerus has a skill that let circles appear (this time white blueish) like in Draco, avoid these to avoid losing HP.
- Glacerus summons mobs, kill them together with the boss with aoes, try to not 1 on 1 them.
Sometimes a message appears in the middle of the screen. 'Glacerus the ice cold channels cold and frost into a storm. Elisia: Save yourself by getting into a protective square'
If that message appears, you need to search for a 'safe zone' otherwise you will get frozen and only other members from the team can unfreeze you.
You can unfreeze somebody by clicking on the person and wait until the message has disappeared (unfreezing.....) Use your pet and partner to tank eventual mobs that deny you to unfreeze.
After the storm you need to use gas as destroyer and crusader debuff and frenzy from berzerker (in case it fails the berserker should use armour break) to ensure the damage done to glacerus is optimal. At that moment the boss has a debuff called 'Violen Roar.' I don't have a screenshot of that debuff, but it increases damage the boss receives and gives the boss a higher probability to receive debuffs of level 4 and lower. If these specialists are frozen, try to unfreeze them as soon as possible so they can use their skill. Use all the attacks you can right after the storm, that is when glacerus is the most vulnerable.
The rewards are 2400 reputation, sp 6 raidbox (might give you sp6) and 1 glacerus mane.
When you're done with the raid you can loot the same things as in Draco. This raid usually only lasts 1-3 minutes, depending on when the first storm comes.
So... you are done with your first glacerus, check the list and join the same team again. Repeat this another 3 times and you're done.
Thank the host for the raids out of politeness and exit the cave. You will come at the npc's from which you got the quests. at these npc's you can exchange your glacerus mane (at sp6 npc) and your draco claw (at sp5 npc) for a perfection gem (strengthens your sp). It takes 5 items (so 5 raids) to get a perfection gem.
Thank you for reading my guide and have fun raiding. -
Contents:
- Basic information about the raids
- Lord Draco
- Basic information
- Team Composition
- How to do the raids
Basic information:
What are these raids?
Lord Draco and Glacerus are the 'SP5/6' raids.These raids are often 90+. You can do them daily (5 times) if you have the corresponding amulets.
You can get the amulet quest in Desert Eagle City (act 5) at Great Magician Kan, (lvl 75 for draco) and at Felix Frost (lvl 80 for glacerus)
(I think there are several quest line guides around on the internet, For example SP5, SP6 )
Hosters like to keep their team for all 10 raids. So if you can't join 10 raids at once, you'll cause trouble for the team, loss of time to search new members and it is a pain to have an ever changing team.
Since the massive nerf update(which came out after my first version of the guide), there is a new NPC in Port Alveus Square called Legendary hunter. You can take daily quests from him: "Vanquish Lord Draco" and "Vanquish Glacerus". The reward for these quests are experience points and Blazing Metal Piece for Draco and experience and Parchment for Grenigas Armour for Glacerus.
"It has recently become the norm to not use bear buff, however the raid
is not a %-damage raid in general. Please ask the host if you should
buff or not. (The crusader defense buff also adds hp, but in contrast to
the bear buff, it adds 1 point to the defence grade. The crusader buff
of defense will be overbuffed by the bear buff.) "
Lord Draco:
Basic information:
Lord Draco is FIRE element, that means you will need fire resistance and usually a water SP. Recommended is to bring a Freya for the debuff.
Recommended is to use attack potions (some hosts require you to use them) and ice flower oils for quicker raids.
Recommended sps:
- Monk (I would recommend NOT to use sacrifice in Lord Draco)
- Blade (for the charge, but most people prefer to use Monk)
- Crusader (for the buff of attack, Triple the host/ strongest person)
- Tidelord (useful for voke, aoe's)
- Blue
mage (if your blue mage is not strong, go tidelord and vice versa,
sometimes the host brings a buffer himself, this sp is usually used for
buff only in that case)
- Scout (scouts do great damage and can hide during the jumps of the boss)
- Ranger (Ranger buff hawk is great to use)
- Wild Keeper (wolf the team and good for mob control)
Extra buffers: (these could speed up the raid, but are not a must)
- Holy Mage (the recent nerf has implemented increased attack in the holy mage buff)
- Volcano Buff (Extra concentration and attack for mages)
- Warrior (Morale)
- Red Mage (not necessary, but it has resistance buff)
How to do the raids:
Firstly you need a team, composed of the above mentioned sps (and eventually some others).
Don't forget to wear your amulet of fire when you are invited/join via list.
The host summons you to 'Dragon Cavern Path' and you begin the raid.
Often you have to go all the way up to the left/right next to the raid mark so you can do buffs outside. Then the raid starts. Buff up in the first room if needed. There are only 2 rooms. The 'reception' with a lever that needs to be pulled to start the raid, and the bossroom. Recommended is to let the monks or blades enter first. Their skills "Targeted Stab" (Monk) or "Light Speed Attack" (Blade) might help to let the boss jump. Activate your attack pot as soon as you start attacking in the bossroom. Draco will occasionally jump, often 2 or 3 times in a raid. Red circles appear on the floor (you need to avoid those) and yellow circles appear at the place where the boss (Lord Draco) will land. If you are in the yellow circles when the boss lands, you die immediately, even if you have full hp. IMMEDIATELY ATTACK AFTER THE BOSS HAS LANDED. The boss has a double debuff after the landing and is very vulnerable. The debuff does only last for 10 seconds.(see picture)
(you can see the debuffs at draco)
- Occasionally the boss will spit fire, so watch out if he does. He can give you a nasty debuff. Try to pot and snack a bit to avoid dying.
- Sometimes Draco can kick you with a skill and do a lot of damage. If you are not wearing fire res or have weak fire res, this can mean your death. This kick usually occurs to close range attackers. It pushes the player away and can give the player "Blackout"
- Draco can use a skill 'Dragon dread' that will disallow you to move. you should try to stay in your attack range, to avoid being unable to attack when this debuff hits you. You still can attack while having this debuff.
- Sometimes mobs spawn. Try not to attack them one on one. Bring them to the boss and let a TL voke them. Kill them there using aoe. If they appear during the red circle time, try to use Song of Sirens as a tl to stun the mobs temporarily. Lure the mobs to boss later and aoe, while attacking boss during the 10 s debuff.
So, when the raid has succeeded you'll get 2200 reputation, a raidbox (which may contain sp5) and a draco claw and you can loot some stuff there. The loot at the bossroom consists of:
Large recovery potions, medium recovery potions, dragon skin (used for upgrade sp5/6 from +1-5), 20k gold and shining violet gemstone (worth 20k) and some cellon (lvl 5/6)
Congratulations, your raid has succeeded. Repeat this raid 4 times. Watch the list after you are done with the raid and back at the raid place to avoid new people taking your spot.
When you're done with 5 times Draco, you need to change your amulet into Glacerus's amulet (Glacier stone) and change your sp and resistance.
Thank you for reading my guide and have fun raiding. -
Dear @Kruely,
Could you place rename the topic to the: [Guide] Mage Class.
Thanks!
Regards,
Prosecutor
-
Family Commands
%Familydeputy NewDeputyName OldDeputyName -- appoint a new deputy
%Familykeeper Appointment Nickname -- appoint a new family keeper
%Familykeeper Dismiss Nickname -- dismiss a family keeper (removes their title - does not remove them from family)
%Familyhead Nickname -- make a family deputy into family head
%Familyleave -- leave the family
%Familyinvite Nickname -- invite a player to join family
%Familydismiss Nickname -- dismiss a family member
%Familyshout Message -- shows a short text in the middle of screen for all family members
%Notice Message -- shows short text to members of a family when joining a channel
The following command works, but does not allow for spaces currently:
%Today Message -- changes your family today message
Social Commands
$Invite Nickname -- invite a player to join your mini-land (must not be restricted)
$Exchange Accept -- accept exchange requests (same as from game options)
$Exchange Block -- block exchange requests (same as from game options)
$Friend Accept -- accept friend requests (same as from game options)
$Friend Block -- block friend requests (same as from game options)
$Family Accept -- accept family requests (same as from game options)
$Family Block -- block family requests (same as from game options)
$Whisper Accept -- accept whispers (same as from game options)
$Whisper Block -- block whispers (same as from game options)
$Party Accept -- accept party requests (same as from game options)
$Party Block -- block party requests (same as from game options)
$Adding Nickname -- add a player in the buddy list
$Groupinvite Nickname -- invite a player to join party
$Partylocation -- see where a party member is located (map - coordinates)
$Pet Accept -- allows pet to be revived after death with seeds of power
$Pet Block -- sends pet to mini-land upon death
$Partner Accept -- allows partner to be revived after death with seeds of power
$Partner Block -- sends partner to mini-land upon death
$Accompany CharacterName -- ask a player to help you in a Time-Space
-- but the command only works when the players are in the starting room of a Time-Space
-- party option must be unblocked for the command to go through
-- players in the same party cannot be invited to the Time-SpaceAnti-Theft Commands
$lock Numbers -- create a lock for your character.
$unlock Numbers -- unlock your character.
$remove_lock Numbers -- remove the character lock.
The following commands do not work:
$Party CharacterName -- originally, this command added a player to your paty, but this will now block party requests
%Assistantmaster CharacterName -- grants power to family member to become deputy
%Homemaker Appointment CharacterName -- appoints a family keeper
%Homemaker Dismiss CharacterName -- removes a family keeper's title
%Inheritance CharacterName -- gives head of family authority to another member
%Invite CharacterName -- invites a player to the family
%Dismiss CharacterName -- kicks a player from the family
%Leave -- leave a family
Typing $Command/$Help into chat reveals a command list, but the family commands from it do not work. The $Party command listed from it also does not work as said via chat.-
1
-
-
What is a Tarot Card?
Tarot cards are cards that you can wear to give your characters certain enhancements. When worn, they go onto this spot of your character page: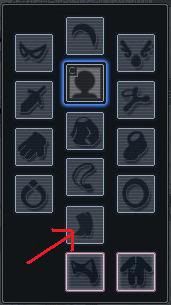
Because of that they can not be used with Amulets of Attack or Defence (or anything else that goes in that spot). Tarot Cards last for 3 hours from the time you open it whether you wear it or not even if you log out, so don't open it unless you're going to be playing for at least 3 continuous hours or you don't mind wasting whatever you don't use of the card.Where do I get Tarot Cards?
Besides buying from other players, there are only two ways of getting Tarot cards.
One is from Nosmall random boxes. Open one and you may be (un)lucky enough to get one (or two depending on the random box) Tarot Card Game(s). Each Tarot Card Game item yields 5 random Tarot cards when opened.
The other way is by visiting Fortune-Teller Nuki In Desert Eagle City (Act5 maps) and accepting his quest.
Here is a list of all the Tarot cards in the game and what they do: The Fool: Movement speed + 1, Gold drop rate+ 10%.
 The Magician: Reduced MP Consumption 20% (including magic), Resist to all elements + 3, Max MP + 2500
 The Lovers: Max. HP + 2000, Max. MP + 2000, Attack + 50
 The Hermit: Defence + 100, Max. HP + 800, Resist to all elements + 3
 Death: Hit Chance + 150, Attack + 150
 The Tower: Experience Gain + 10%, Gold Drop Rate + 10%
 The Star: Experience Gain + 15%, Movement Speed + 1
 The Moon: Max. MP + 1500, Attack + 50, Defence + 50
 The Sun: Movement Speed + 1, Attack + 250, Max. MP + 800
 The Devil: Movement Speed + 1, Attack + 250, Max. HP + 800
-
1
-
-
Dear Community,
Here will be added some usefull links for you. Then can be not only in EN language.
-
2
-
[List]Reputation
in Guides & Tutorials
Posted
Dear @Elrond,
This list already present: CLICK
Regards,
Prosecutor